

In today's fast-paced world, the need for real-time, efficient, and collaborative geographic information system (GIS) solutions has become paramount. Enter ArcGIS Online, a dynamic platform that has revolutionized the way organizations manage, share, and analyze spatial data. This groundbreaking tool doesn't just stop at traditional desktop GIS; it seamlessly integrates with mobile GIS applications like Collector, Field Maps, and Survey123, opening up a world of possibilities for users to map features with the convenience of their smartphones and have their data synchronized back to the office in real-time.
What truly sets ArcGIS Online apart is its ability to attach photos and other files to spatial data. This feature is a game-changer for surveys and inspections. Users can capture geolocated photos directly from their mobile devices and link them to specific map features. This capability enhances data completeness, provides visual context, and simplifies post-field analysis. Imagine conducting environmental assessments, infrastructure inspections, or wildlife studies with geolocated photographic evidence at your fingertips.
While a fantastic feature, many users cite issues with handling photo collections. For example, it is quite simple to log in to ArcGIS Online and download a single photo from a feature, but downloading a whole bunch can be difficult. You can download them to a local geodatabase, but even then it is not clear how to export the photos from the geodatabase so that you can browse them in a photo viewer. And if you solve that, the photos end up with generic names instead of the name of the feature they were derived from.
In this blog, we will solve this for you, using ArcGIS Online and ArcGIS Pro.
Download your layer
First, you need to open ArcGIS Pro, connect to your hosted account (Sign in to ArcGIS Online) and add your layer via the “Add data” button and browsing the “Portal” section. Once it is in your map, right click the layer in the table of contents and select “Data” and then “Export features”. By default, the option to download attachments will be enabled (refer to the “Maintain attachments” in the Environments tab. Note, that if you apply a selection first, the download will include only the selected features. This is great if you only want a subset of your layer.
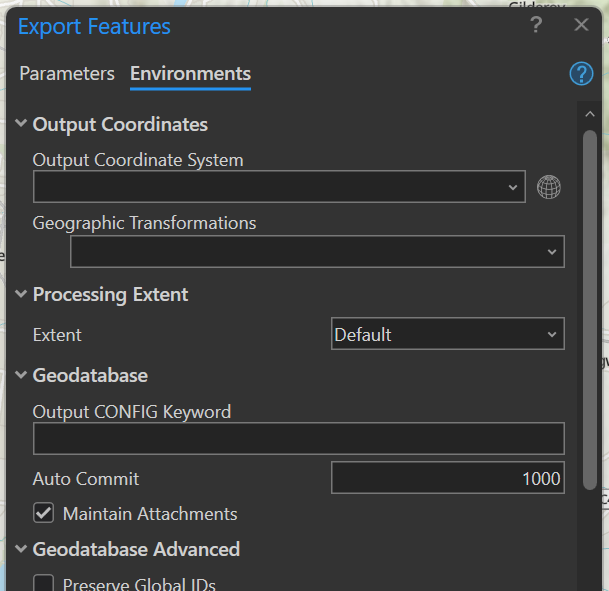
The Environments tab, showing that “Maintain Attachments” is checked.
As well as creating a feature class in your geodatabase, you will also have a table and relationship class item which have “ATTACH” and “ATTACHREL”.
Setup a new tool from a script
If you’re new to python, don’t stress! We’ll help you.
First, open a notepad document and paste the following script into it:
import arcpyfrom arcpy import daimport osinTable = arcpy.GetParameterAsText(0)fileLocation = arcpy.GetParameterAsText(1)with da.SearchCursor(inTable, ['DATA', 'ATT_NAME', 'ATTACHMENTID']) as cursor: for item in cursor: attachment = item[0] filenum = "ATT" + str(item[2]) + "_" filename = filenum + str(item[1]) open(fileLocation + os.sep + filename, 'wb').write(attachment.tobytes()) del item del filenum del filename del attachmentSave and exit notepad, then rename the file (and its extension) as “ExportAttachments.py”.
Next go into the catalog view, and into the toolbox section. Right click on your toolbox and select “New”, then “Script”. On the General tab, type the Name and Label for the script tool. For example, type “ExportAttachments” as the Name, and “Export Attachments” as the Label. Then check that the “Store tool with relative path” is checked. On the Parameters tab, type “Attachments Table” in the first row of the Label column, and set the Data Type as “Table”. This is the first parameter of the script tool and it defines the table containing the attachments to export. In the second row, add a second parameter with the Label name as “Output Location”, and set the Data Type as “Folder”. This parameter defines the folder to locate the exported attachments.
Finally, on the Execution tab, click the Browse icon next to the Script File field, and navigate to the location of the script file you saved earlier, select the script and click OK.
You’ve now created a custom tool referencing your script and setup which parameters need to be configured to run the tool.
Run the tool
Now, double click the new tool to open it. It will open as a geoprocessing tool with the Attachments Table and Output Location that we setup earlier, as parameters. For the Attachments Table parameter, select the attachment table that was downloaded at the start (it will have “_ATTACH” at the end of its name). Then select a folder location on your computer for the Output Location. Click Run.
After running the script, your attachments come up with this generic naming structure: ie. there's no easy way to match them to the original features that they were related to.

The downloaded and exported photos, except all have generic names which are unable to be linked to the original features that you mapped.
Link the photos to your data
Now you need to define a field in your data to be the name for the photos. This could be a survey number or other identifying field. In this example, we’ve concatenated the site and number to give “SiteNumber”.

The “SiteNumber” field is being prepped to be used as the photo name.
This text field will end up being the file name of your photos, so it will need the file extension “.jpg” added. Use the field calculator for that.

The “SiteNumber” field has the .jpg file extension.
To get this unique text into the ATTACH table, you'll need to use a join field. First create a text field in both the feature class that you downloaded and the ATTACH table. Use the field calculator to populate it with the GlobalID. In the ATTACH table, specifically calculate it as the REL_GLOBALID. As this is the relate used in the ATTACH table itself.

The newly created “TextGlog” field is calculated to match the “REL_GLOBALID” field.
Create a Join to get the unique name over to the ATTACH table. That is, the join will match the TextGlob from the ATTACH table with the GlobalID in the original feature class that has the photo names.
The resulting att table should look like this:
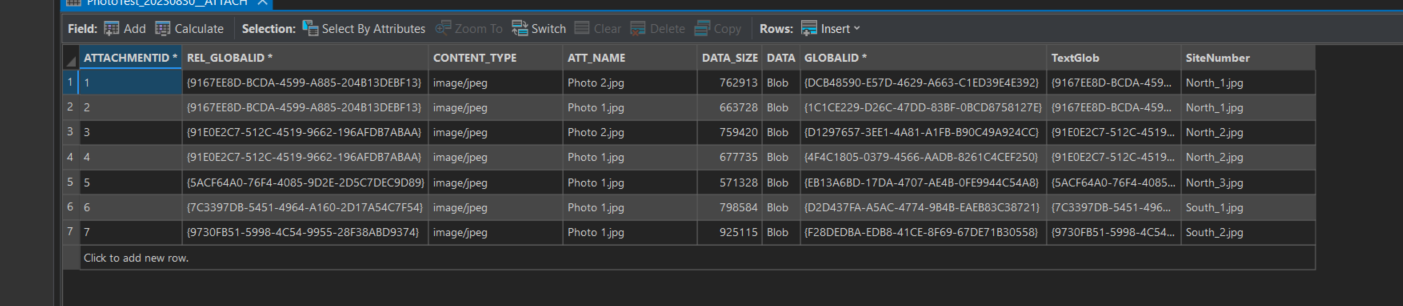
The ATTACH table now has the SiteNumber field linked to it.
Rename your photos
Now, open the ExportAttachments.py file, and change “ATT__NAME” to “SiteNumber” (or whatever your relevant naming field is called) and save.
with da.SearchCursor(inTable, ['DATA', 'SiteNumber', 'ATTACHMENTID']) as cursor:Go into your projects toolbox, and re-add the updated python file to the tool.
Run the tool again, and your photos will now have a meaningful name.

The photos are now named based on the “SiteNumber” field.
While this workflow seems long and tedious, if you take the time to understand what you are doing in each step, it will be much simpler to implement in the future. It will likely save you a lot of time in downloading files one by one, or renaming them manually.